Introduction
mail2many is a cloud-based email marketing solution for small and large companies. Simple and fast. Secure and customizable. With mail2many you can manage your subscribers and subscriber groups, and create and send newsletters to them. You can track the success of your newsletters and much more.
mail2many API is a RESTful API that allows a external application to interact with the mail2many platform. You can create, read, update, and delete mail2many data. You can also send newsletters to subscribers and get back statistics about the newsletters.
The mail2many API is organized around REST. Our API has predictable resource-oriented URLs, accepts JSON-encoded requests, returns JSON-encoded responses, and uses standard HTTP response codes, authentication, and verbs.
But first things first: To use the mail2many API you should understand how mail2many is structured. You should know some terms and concepts. The most important ones will be explained in the following sections.
After that, you can read the API Usage. This documentation gives detailed information about how the mail2many API works. It explains how to authenticate, how to send requests, how to handle responses, how to filter, sort, and more.
In addition we provide a documentation with all available Endpoints. It explains how to use the endpoints, what parameters are available, what responses you can expect, and much more.
Let's get started!
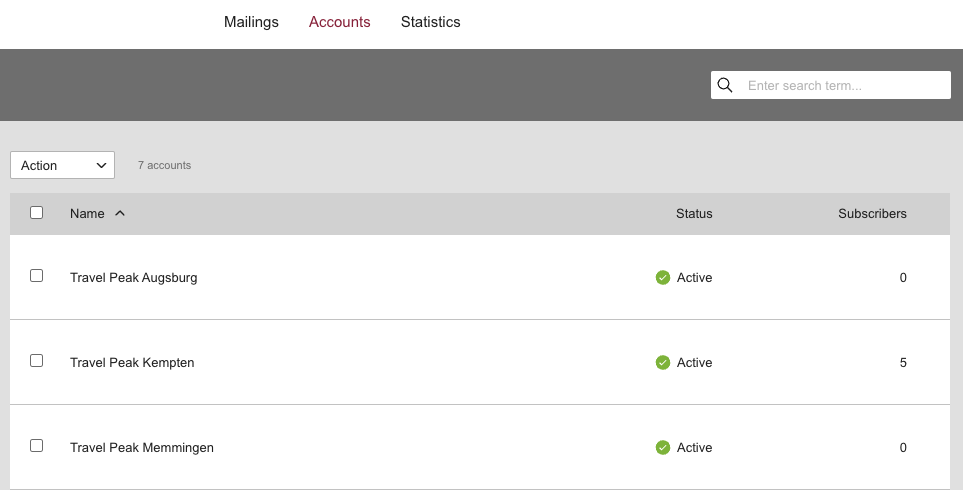
The first term you should understand is account. An account gets created when a new customer signs up for mail2many. It has an ID, a type and a name. The ID is a unique identifier for the account.
There are two different types of accounts, the L-Account and the S-Account. In the L-account users can manage S-Accounts and publish mailings and articles to them. An S-Account can be an sub-account of an L-Account but or even be a standalone account. In the S-account users can manage subscribers and send out mailings.
Each account is independent, has its own settings and own data. Each S-account has its own subscribers and sends out own mailings. If you access the mail2many API you always access a single account. Each request to the API will access the data of the account you are authenticated with.
A customer can have multiple accounts which can be grouped together, but this is not important for the API as it always accesses one account at once.
User
An user is a person who has access to an account via our interface. An user can have multiple roles and
permissions. The roles and permissions are used to determine what an user can do in the application.
An user can have access to one or multiple accounts and have different roles in each account.
For the mail2many API the users don't matter as the API is always called with the API key but is explained here
to show the difference between an user and an account as this was confusing for some developers.

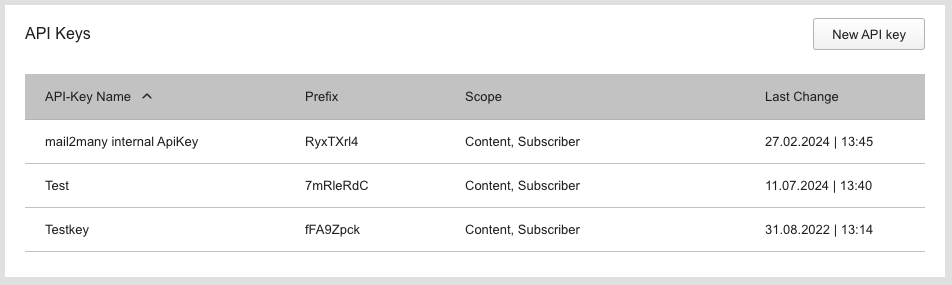
API Key
Important for accesing the API is the API Key. You access the accounts by using API Keys. A single account can
have multiple API Keys with different permissions. This allows users to create different keys for different
purposes or multiple Keys for third party applications.
If you have an admin user in the mail2many account, you can log-in and create API Keys in the account settings.
If you don't have access to the account you can ask the account owner to create an API Key for you.
Each API Key has a set of permissions which define what the API Key can do. The permissions are used to restrict
the access of the API Key to the account. The permissions are set by the account owner and can be changed at any time.
As the API Key gives access to the account, it should be kept secret. It should be exchanged only over secure
channels and should be stored as save as a password. If you think your API Key is compromised delete it in the
account settings and create a new one.
The API Key always has prefix which is used to identify the api key followed by a dot and the unique key. The
schema is: {PREFIX}.{UNIQUE_KEY}.
The API Key is sent as the password of the basic authentication header. The username can be anthing you want.
The basic authentication header must be sent with each request to the mail2many API. We decided to use basic
authentication as it is easy to use and secure.
If you want to know which account you are accessing with your API Key you can use the /whoami
route. This route returns the account the API Key is associated with.
Webhooks
Webhooks are used to notify an external application about events in mail2many. They are calling an external URL when certain events happen in the mail2many account.
For example there are webhooks which are called when a subscriber confirms the opt-in or unsubscribes from the newsletter.
As developer of a third party application you can use webhooks to integrate mail2many with your application if you want to react on certain events immediately.
For example you can use the opt-in webhook to add the subscriber to your own CRM system or the opt-out webhook to remove the subscriber from your own mailing list.
Creation
Webhooks can be created via the mail2many interface in the account settings if you have the admin role. When creating a webhook you can choose a name for the webhook,
which events should trigger it and the URL which should be called.
You can use the same url and choose multiple events to have a single endpoint which handles multiple webhook events or create multiple webhooks with different urls for different events.
The URL must be publicly accessible, encrypted with HTTPS, able to handle POST requests and return a 2xx status code.
Secret & Validation
After creation mail2many will show you a webhook secret which is used to sign the webhook requests. You should store this secret immediately as its only
shown once because of security reasons. You should store this secret securely and threat it like a password because if hijacked someone could send fake webhook
requests to your application in behalf of mail2many.
To verify the authenticity of the request, you can use the X-Mail2Many-Signature header. This header contains a HMAC-SHA256 signature
which is generated using the webhook secret and the request body. You can use this signature to verify that the request was sent by mail2many
and not by a third party.
To verify the signature, you need to compute the HMAC-SHA256 hash of the request body using the webhook secret as the key.
Then you need to compare the computed hash with the value of the X-Mail2Many-Signature header.
If the values match, the request is authentic.
Request Format
When an event happens which triggers the webhook, a POST request is sent to the specified URL. The request contains specific headers and a JSON payload
with information about the event. You can use this information to validate the sender and update your application or trigger other actions.
The request contains the following headers:
X-Mail2Many-Account-Id: The ID of the account where the event happened.X-Mail2Many-Event: The event which triggered the webhook.X-Mail2Many-Event-Date: The date when the event happened.X-Mail2Many-Event-Id: A unique identifier for the event.X-Mail2Many-Signature: A signature which can be used to verify the authenticity of the request using the webhook secret.
The JSON payload contains the following fields:
accountId: The ID of the account where the event happened.event: The event which triggered the webhook.date: The date when the event happened.
In addition to the fields above, the payload contains additional fields depending on the event which triggered the webhook. For example, if the event is
optin, the payload contains information about the subscriber who confirmed the opt-in and the newsletter they subscribed to. For more information
check the specific events later in the documentation.
Here is an example how to read, parse and validate the webhook request in PHP:
$secret = 'your_webhook_secret';

$headers = getallheaders();

$payload = file_get_contents('php://input');

$signature = $headers['X-Mail2many-Signature'] ?? '';

$computedSignature = hash_hmac('sha256', $payload, $secret);

if (hash_equals($computedSignature, $signature)) {

    // The request is authentic, get payload data
    $data = json_decode($payload, true);

    // Process the webhook data
    http_response_code(200);
    exit;
} else {

    // The request is not authentic skip processing
    http_response_code(401);
    exit;
}
Webhook metadata such as the event ID, timestamp, event, and signature is included in the HTTP headers to ensure
reliable and secure processing. Headers allow recipients to verify authenticity and integrity before parsing the request
body, which improves performance, enables early rejection of invalid or replayed requests, and aligns with best
practices used by major platforms. Since headers are always visible to proxies, firewalls, and logging tools,
they provide a stable and predictable place for essential verification data.
Recipients should validate the signature using the raw request body, confirm that the timestamp is within an acceptable
time window, and ensure that the event ID has not been processed before to prevent replay attacks. Using only the header
values and the body content, the receiver can fully authenticate the webhook and safely process the included event
payload.
Make sure that the url is publicly accessible and that your application can handle the incoming webhook requests and respond with a 2xx status code.
Your endpoint must respond within 12 seconds. If your application responds with a non-2xx status code, does not respond within this time,
or the connection otherwise fails (e.g. DNS or connection errors), the webhook delivery is retried up to 5 times with increasing delays
(1 minute, 5 minutes, 15 minutes, and 2 hours) before it is marked as permanently failed. If your application needs more time to process the event,
we recommend responding with a 2xx status code immediately and processing the event asynchronously.
Because retries can resend the same event, use the X-Mail2Many-Event-Id header to detect and ignore duplicate deliveries — it stays the same
across all retry attempts for a given event.
Events
The following events are currently supported.
|
Event
|
Name
|
Description
|
| optin |
Opt-In Confirmation |
The subscriber was not active, confirmed the opt-in
and is now active.
|
| optin_additional_channels |
Opt-In Confirmation (additional channels) |
The subscriber was already active in at least one channel
and confirmed the opt-in for one or more additional channels.
|
| optout |
Complete Unsubscribe |
The subscriber was active, unsubscribed from all channels
and is now inactive.
|
| optout_individual_channels |
Unsubscribe (individual channels) |
The subscriber unsubscribed from one or more individual
channels but is still active in at least one other channel.
|
| manual_archiving |
Manual Archiving |
The subscriber was manually archived by a user or
third party application.
|
| hardbounce |
Hardbounce |
The subscriber was archived because their email
address could not be delivered (hard bounce).
|
| spam_complaint |
Spam Complaint |
The subscriber was archived after marking a mailing as spam.
|
| blacklist_archiving |
Archiving by Blacklist |
The subscriber was archived due to a blacklist entry.
|
| api_archiving |
Archiving via API |
The subscriber was archived via the API.
|
Payloads
At the moment each event have the same payload:
|
Key
|
Description
|
Example
|
| accountId |
ID of the account where the event happened. |
1 |
| event |
Event which triggered the webhook. |
optin |
| date |
Date when the event happened in UTC. |
2025-11-27 09:52:31 |
| email |
Email address of the subscriber who triggered the event. |
john.doe@example.com |
| title |
Academic title of the subscriber. |
Dr. |
| firstname |
First name of the subscriber. |
John |
| lastname |
Last name of the subscriber. |
Doe |
| genderId |
Gender of the subscriber: 1=male, 2=female, 3=non-binary, 4=not specified. |
1 |
| status |
New subscriber status (1=receive ready, 2=not receive ready, 3=archived). |
3 |
| statusAddition |
New status addition (null=none, 1=optin pending, 2=no optin, 3=transaction, 4=unsubscribed, 5=hard bounce, 6=manual, 7=complained, 8=black list). |
6 |
| ip |
IP address of the subscriber when the event happened. |
192.168.1.1 |
| channelIds |
IDs of the channels the subscriber subscribed to or unsubscribed from. |
[1, 2] |
| newsletterId |
ID of the newsletter the subscriber subscribed to or unsubscribed from. |
1 |
| newsletterSubject |
Subject of the newsletter the subscriber subscribed to or unsubscribed from. |
Welcome to our newsletter! |
More events will be added in the future. If you have a special use case, please contact our support.
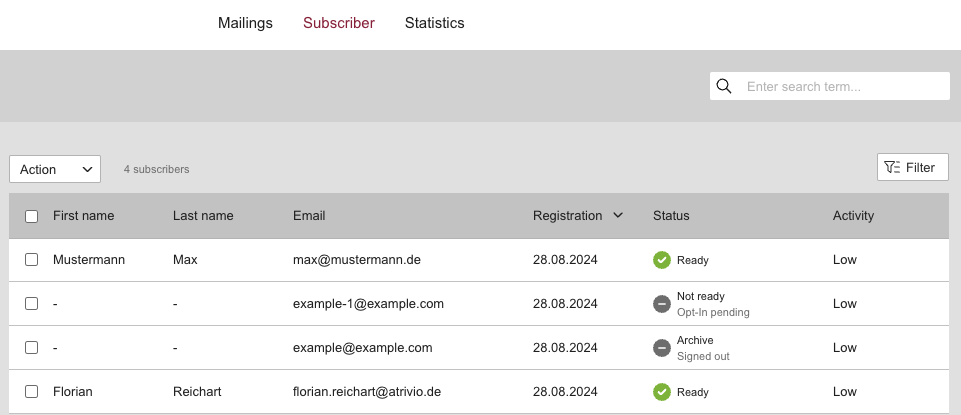
A subscriber is a person or organization that has subscribed to an mail2many account and receives newsletters from this account. It is the most important entity in the mail2many system and the most used entity in the API.
The only mandatory data of the subscriber is the email as it is necessary to send out newsletters. In addition each subscriber has base data like name, surname, birthday and can optionally have customer specific data.
Customer specific data is defined by the customer and can be used in every account of the customer. The customer specific data can be everything from a simple text field to a boolean or a date. See the section Custom Fields for more information.
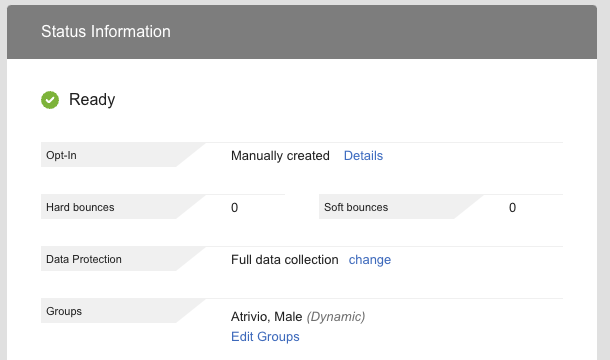
Each subscriber has a status which tells the system if a subscriber is ready to receive newsletters.
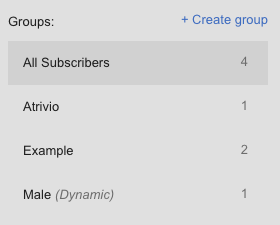
The subscribers can be grouped in groups. A group is a collection of subscribers that can be used to send out newsletters to a specific group of subscribers.
You can find the endpoints and the fields of the subscriber in the endpoint documentation.
Subscriber Group
A subscriber group is a group of subscribers. A subscriber group can be used to send newsletters to a specific
group of subscribers. The default is sending newsletters to all subscribers of an account. A subscriber group has a name and a type.
There are three different types of groups: 1=static, 2=dynamic, 3=external. A static group is a group where
subscribers are added manually in the interface. A dynamic group is a group where subscribers are added based on conditions. An
external group is a group where subscribers are managed from an external source.
If you create subscriber groups with the mail2many API you can set permissions for the subscriber group. You can
define if users in mail2many can edit, delete or assign subscribers to the subscriber group.
An account can have multiple subscriber groups. A subscriber can be in multiple subscriber groups. A subscriber
group can have multiple subscribers. A single subscriber will only get a newsletter once even if he is in
multiple subscriber groups.
You can find the fields of the subscriber group in the endpoint documentation in the schema section.
Subscriber Status
Each subscriber has a status which defines if the subscriber is ready to receive newsletters. If the account
uses the channel module, each subscriber has a status for each channel. Here we focus on accounts without
channels. More about channels in the channels section.
There are three different values for status:
|
Status
|
Name
|
Description
|
| 1 |
RECEIVE_READY |
The subscriber is ready to receive
newsletters. |
| 2 |
NOT_RECEIVE_READY |
The subscriber is not yet ready to
receive newsletters. |
| 3 |
ARCHIVED |
The subscriber is archived. |
Each status also has a so-called status addition which gives detailed information of the status. These additions can
be:
|
Status
|
Name
|
Additions
|
| 1 |
RECEIVE_READY |
null |
| 2 |
NOT_RECEIVE_READY |
1=OPTIN_PENDING, 2=NO_OPTIN,
3=TRANSACTION |
| 3 |
ARCHIVED |
4=UNSUBSCRIBED, 5=HARD_BOUNCE, 6=MANUAL,
7=COMPLAINED |
The status could look like this:
RECEIVE_READY
{
    "status: 1,
    "statusAddition": null
}
ARCHIVED
{
    "status: 3,
    "statusAddition": 4
}
A mailing is a container in mail2many that holds newsletters. It is created by the user in mail2many. It has a mailing template, a name, a sender and knows to whom and when the dispatch should take place. It also has a status, whether it is in draft, planned or sent.
The mailing template defines which type the mailing is. The user can choose from different types like a standard mailing, opt-in, birthday, trigger mailing and more. The name is just used for internal purposes and the sender consists of a name and an email address.
A mailing consists of one or more newsletters. A newsletter is the actual content that is sent to the subscribers. It has a subject, a body and can have attachments. The newsletter can be created in the mail2many editor or own html can be uploaded to mail2many.
At the moment its not possible to create mailings via the API. But its possible to send out so-called trigger mailings. More about this topic in section trigger mailings.

Newsletter
As described above is a newsletter a part of a mailing. It is automatically created when a mailing is created. It has a theme, a
subject and a content.
The theme determines the appearance of the newsletter. The subject will be diplayed in the email client of the recipient. The content is the actual content of the newsletter and consists of articles.
Not the mailing but the newsletter is sent to the recipients, which means that also the newsletter has statistics.
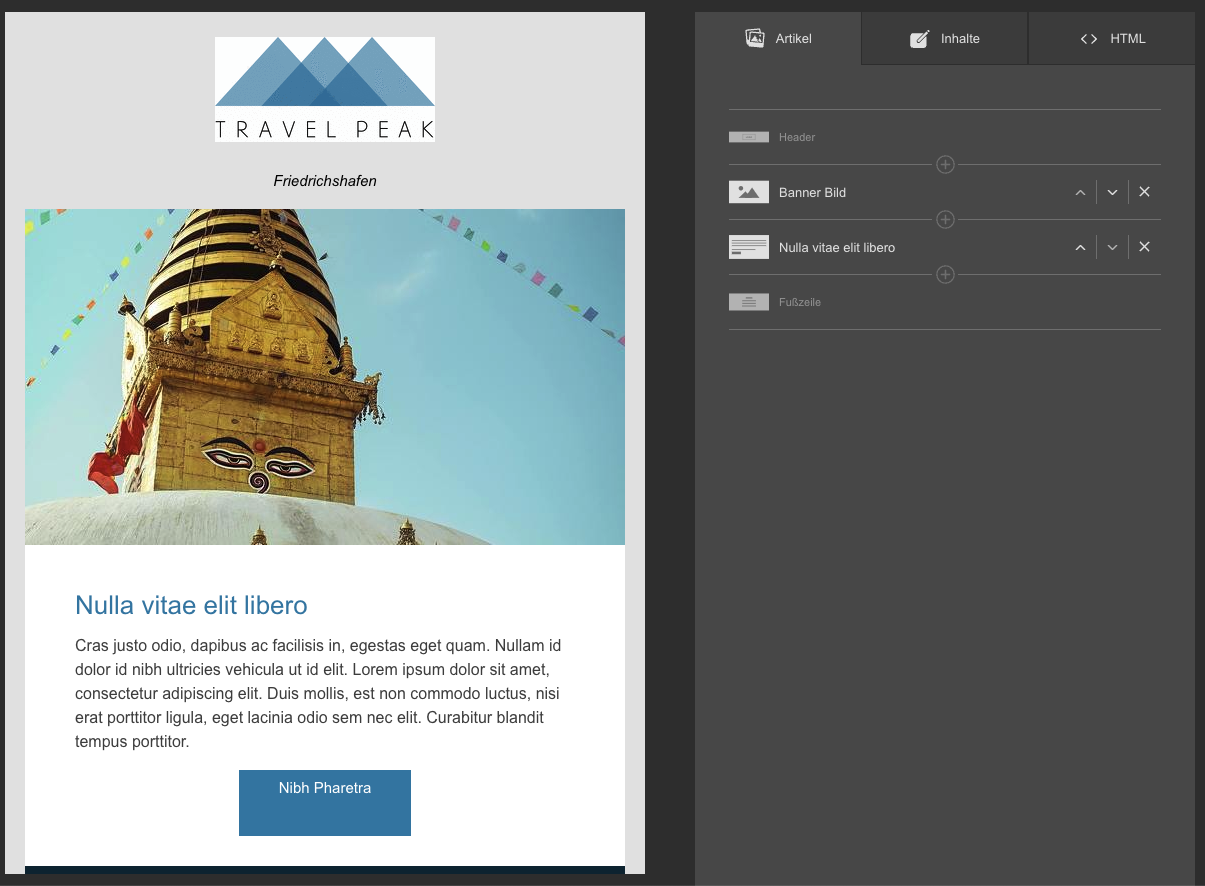
Article
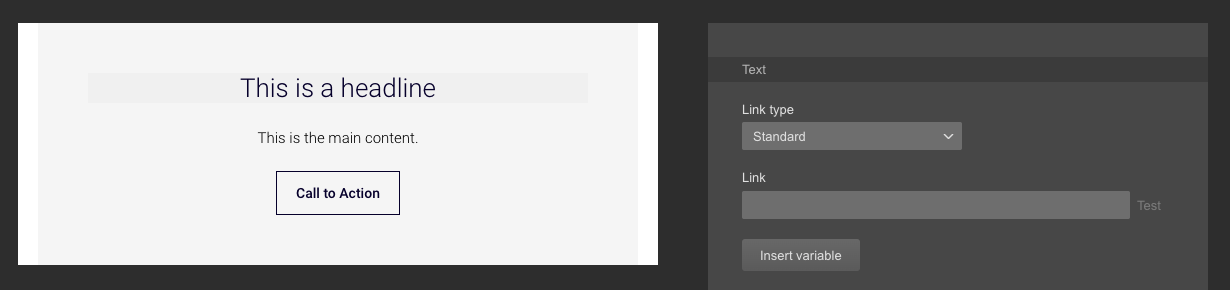
A article is a part of a newsletter. It has a template and a content.
The template determines the appearance of the article and which placeholders are available. The content consists of placeholders like
texts, buttons and images that the user fills with content.
For example there could be a template just with text and a template with text and image. The user can choose the template and fill the placeholders with content.
mail2many allows external systems to send so-called trigger mailings to receivers. They are called trigger mailings because the transmission is triggered external from third-party-system.
The trigger mailings must be created and activated from a user in mail2many, and have a so-called TriggerType. The TriggerType helps to identify the correct mailing. If the mailing changes in mail2many, the API call does not have to be adapted as the TriggerType remains the same. The trigger types can be requested with the endpiont GET /triggerTypes. Please note that the language of the mailing is also important as the trigger mailing can exist in multiple languages.
In addition to the TriggerType the trigger mailings can have placeholders. The placeholders are different for each TriggerType and are defined together with the trigger type. Before you send a trigger mailing you have to know the placeholders. Currently there is no API to read the placeholders, they must be requested from the developer of the trigger mailing. When sending trigger mailings the values for the placeholders must be transfered for each receiver. Since they are transfered for each receiver, each receiver can receive a different content.
The are two different types of trigger mailings.
Single trigger
Single triggers mailings are triggered by an external action or event and mail2many send them directly to a single receiver. A good example is the password-reset mail. It can be triggered by a external system when a customer requests a new password. The customer expects to get the password-reset mail instant and only a single customer must be contacted. Another example is a booking confirmation. The customer expects to get the confirmation mail instant after the booking.
The statistics of single trigger mailings are always added up in mail2many. This means, for example, that you can see the total open and click rate across all send single trigger mailings. If you send out 100 trigger mailings in the last month and 30 of them were opened, the open rate is 30%.
There are two different endpoints for sending this type of mailings. The first one is the POST /mailings/singleTrigger. This route is suitable to send a single trigger mailing to a single receiver. This would fit good for the password-reset mail.
The second one is POST /mailings/singleTrigger/batch. As the name suggests this endpoint can be used to send the same single trigger mailing to multiple receivers within one request to mail2many. Up to 100 receivers can be triggered in a single request. This endpoint is intended for triggering several receivers in one request. Nevertheless, the placeholders allow the receivers to receive different content. A good example is the booking when a single customer booked multiple holidays and you want to send a booking confirmation for each booking. In the background this will use the same logic like the first type but you don't have to send multiple requests to mail2many.
In mail2many every mailing has a sender name and every newsletter and subject which is maintained by the editor. But its possible to overwrite these values with the singleTrigger-endpoints. The sender name can be overwritten globally at the top level for every receiver. The subject can also be overwritten globally. However, it is also possible to transfer a separate subject for each receiver.
Campaign
The other type are so-called campaigns. These differ a little from the single trigger mailings. With this type, a copy of the trigger mailing must first be created. Then any number of receivers are transmitted for the previously created copy. In the last step, the copied mailing must be scheduled for dispatch. A good example is if you want to send out a newsletter to all customers who have not bought anything in the last 6 months.
mail2many then sends the mails to the receivers in the background using a background worker. You can check the status of the transmission by querying the copied mailing with the endpoint GET /mailings/trigger/{id}. With campaigns you can send trigger mailings to a large group of receivers. The copy makes it possible to record the statistics individually per campaign.
The first endpoint to create the copy is POST /mailings/trigger. Receivers can be transfered with the POST /mailings/trigger/{id}/receivers endpoint. The scheduling must be done with POST /mailings/trigger/{id}/schedule.
The rules for sender name and subject also apply to the campaigns. The stored sender name and subject can be overwritten globally when creating the mailing copy. The subject can optionally be adjusted per receiver if necessary.
Difference
Both types use trigger mailings in the background and can be called from external. So how do the two types differ?
The single trigger is particularly suitable if you want to send a newsletter to a single receiver or to just a few receivers. It is also a good option when you want to send out instant. On the other hand it should not be a problem if the statistic is collected across all transmissions.
If you want to write to larger numbers of receivers and evaluate the statistics individually, the campaign trigger is suitable. The dispatch is done in the background and the statistics are created individually for each campaign. As this is done with a background worker it can take some time until the receivers get the mail.
Example requests can be found in the endpoint documentation.
Mail2many supports the use of so-called channels. Channels can be used if a customer want to manage different newsletter topics in one mail2many account but wants to have only one list of subscribers. Every channel can have own register and unsubscribe pages, and can have its own layout and own opt-in and opt-out mailings.
The channels can created directly in the s-accounts or interitated from the l-account. Subscribers can subscribe und unsubscribe to and from individual channels. When creating a mailing, you must select the channel of the mailing. Only subscribers who have subscribed to the corresponding channel receive the newsletter.
The channels can be used for different puposes. For example, you can use it if you want to send out newsletters for different topics or if you have multiple brands or multiple products.
Usage
A requirement for using the channels is that the account has booked the Channels module. Afterwards, the channels can be managed in the mail2many settings page.
To read the channels you can use the GetAllChannels endpoint. This provides you with all channels of an account with ID and a name.
You will then need this information when dealing with subscribers. Instead of a global status, you have to work with a status for each channel.
Endpoints
Get
When reading subscribers, it may be necessary to obtain the information about the channels. In this case, you must send an include parameter in the URL. This could look like this, for example:
Example Parameter
You then get a relationship. This looks something like this:
Response body
{
    "objectType": "Subscriber",
    "id": 1,
    "email": "mail@example.com",
    "channels": {
        "data": [
            {
                "objectType": "Channel",
                "id": 1,
                "isDefault": true,
                "type": 1,
                "status": 2,
                "statusAddition": 1,
                "optinAt": null,
                "optinIp": null,
                "optoutAt": null,
                "optoutIp": null,
                "optoutNewsletterId": null,
                "receivedOptinAt": null,
                "translations": {
                    "de": {
                        "name": "Newsletter",
                        "description": null
                    },
                    "en": {
                        "name": "Newsletter",
                        "description": null
                    }
                }
            }
        ]
    }
}
Register
The register route is the simplest way to connect mail2many. Whenever a subscribers signs up, you can simply pass on the registration. mail2many takes care of everything. If you do not transfer any channels, mail2many uses the channels stored in the API key. If you want to transfer channels, you can do so as follows:
Request body
{
    "email": "mail@example.com",
    "channelIds": [
        1,
        2
    ]
}
If the subscriber is new, he receives an optin mailing with the stored or transfered channels and is pending for the time being.
If the subscriber already exists, there are two possibilities. If he already has the status ready to receive in another channel, then the new channel or channels are assigned to him as ready to receive without sending an opt-in.
If he does not have any ready-to-receive channels, he receives an opt-in with the stored and transfered channels and is pending as well. All channels which are already receive-ready are not touched.
If you want the subscriber to always receive an opt-in, even if he already has a channel ready to receive, you can force this with the option "forceOptIn".
Request body
{
    "email": "mail@example.com",
    "channelIds": [
        1,
        2
    ],
    "forceOptIn": true
}
If you need the channel information in the response you can also send the include=channels parameter.
Its also possible to pass subscriber groups to the register endpoint. In this case the subscriber will be added to the given groups. The first option is to pass ids, for example:
Request body
{
    "email": "mail@example.com",
    "channelIds": [
        1,
        2
    ],
    "subscriberGroupIds": [
        1,
        2
    ]
}
The second option is to pass the group names. If the group exists, the subscriber will be added to the group. If the group does not exist, it will be created and the subscriber will be added to it. This looks like this, for example:
Request body
{
    "email": "mail@example.com",
    "channelIds": [
        1,
        2
    ],
    "subscriberGroupNames": [
        "Group A",
        "Group B"
    ]
}
By default the old groups of the subscriber are kept in the register route. If you want to remove the old groups, you can pass an option for this:
Request body
{
    "email": "mail@example.com",
    "channelIds": [
        1,
        2
    ],
    "detachSubscriberGroups": true,
    "subscriberGroupIds": [
        1,
        2
    ]
}
Create/Update/Upsert
If you use the advanced subscriber endpoints "Create", "Update" or "Upsert", then the use of the channels becomes a little more complicated. In this case you have to handle the status per channel. You must then transmit status and statusAddition per channel. This looks like this, for example:
Request body
{
    "email": "mail@example.com",
    "channels": [
        {
            "id": 1,
            "status": 2,
            "statusAddition": 1
        },
        {
            "id": 2,
            "status": 2,
            "statusAddition": 1
        }
    ]
}
If you need the channel information in the response you need to send the include=channels parameter.
If you need further information or help, please feel free to contact us.
In mail2many it is possible to upload your own HTML for newsletters. In this HTML, so-called variables can be printed. A distinction is made between simple variables and variable areas.
The variables and variable areas can be tested with the test mailing. Here, data of the recipient is used if the recipient is present in the subscriber list of the account.
The following variables are available.
|
Id
|
Name
|
Example
|
Subscriber field
|
| 1 |
Salutation |
Herr, Frau
Mr., Mrs.
Monsieur, Madame |
genderId |
| 2 |
Firstname |
Erika |
firstname |
| 3 |
Lastname |
Mustermann |
lastname |
| 4 |
City |
München |
city |
| 5 |
Age |
35 |
birthday |
| 6 |
Formal Salutation |
Sehr geehrter Herr, Sehr geehrte Frau
Dear Mr., Dear Mrs.
Cher Monsieur, Chère Madame |
genderId |
| 7 |
E-mail |
erika.mustermann@example.com |
email |
| 8 |
Individual Salutation |
Hello Erika |
salutation |
Simple variables
The simple variables must be inserted with the help of an ID and should have a default value. This value is used if the variable cannot be replaced for the subscriber. A separate default value must be set for each variable.
The variables must be inserted in the following form:
Example with empty default
Variable areas
The other possibility is to work with variable areas. Here you can define whole text areas and each area can contain plain text as well as multiple variables. Each area has to have a unique area number and a fallback.
If one of the variables in the area cannot be replaced for the subscriber, the default value is used. This variant is more flexible because you can combine text and multiple variables.
Attention: In this case, you have not to define a default for each variable, which is why the syntax is a little different.
The variable areas must be inserted in the following form. Make sure that keep the area number unique:
Syntax
[[A:-:AREA-NUMBER:-:TEXT:-:DEFAULT]]
Example #1
[[A:-:1:-:Hello {{V:1}} {{V:3}}:-:Hello]]
Example #2
[[A:-:2:-:Greetings to {{V:4}}:-:Many greetings]]
In mail2many it is possible to define individual fields for every customer. These fields can be created by us when the customer requests it. Every field gets an unique id and has a field and data type.
There are three different field types: subscriber, account and mailing. While the subscriber fields can be set individualy for every subscriber and the mailing fields for each mailing, the account field can only be set once in an account. Examples for a subscriber field could be their favourite country or if they have a VIP status. A mailing field could be a campaign id from an analytics tool. An account field could for example be the company name for the logo.
These are the three available field types:
- 1=subscriber
- 2=account
- 3=mailing
Additionally every field has one of the following data types:
- 1=string
- 2=integer
- 3=date
- 4=boolean
Reading
There is an endpoint for reading all customer fields. This endpoint provides you with all fields of an account with ID, names, field type and data type.
The response could look the the following:
Request body
{
  "data": [
    {
      "objectType": "CustomerField",
      "id": 1,
      "fieldType": 1,
      "type": 1,
      "isAvailableForImport": false,
      "isAvailableForExport": false,
      "isEditable": true,
      "translations": {
        "de": {
          "name": "Lieblingsland",
          "description": null
        },
        "en": {
          "name": "Favourite country",
          "description": null
        }
      },
      "value": null,
      "createdAt": "2024-09-10 14:14:07",
      "updatedAt": "2024-09-10 14:14:07"
    }
  ],
  "meta": {
    "include": [],
    "meta": {}
  }
}
The fieldType defines if it is a subscriber, account or mailing field. The type defines the data type.
Saving
The subscriber fields can be saved in every subscriber request within the key customerFields. This can be the register or any other subscriber route. You must use their correct id and pass the correct data types. In this example we have these 4 fields:
- Favourite country (string)
- Number of booked trips (integer)
- Last trip (date)
- VIP subscriber (boolean)
The request could look the the following:
Request body
{
    "email": "florian.reichart@atrivio.de",
    "customerFields": {
        "1": "Nepal",
        "2": 2,
        "3": "2018-06-01",
        "4": true
    }
}
The accounts fields must be saved directly in the account. There are two routes for saving the default values, check the customer field section of the endpoint documentation. This could look like the following:
Request body
{
  "value": "My Company name"
}
Usage
The customer fields can be used in the same way variables can. The only different is that C must be used instead of V.
Please check the following examples:
The customer fields can also be used in the variable areas and be combined with variables.
Area example
[[A:-:1:-:Hello {{V:1}} {{C:3}}:-:Hello]]
In mail2many it is possible to store own pages for opt-in confirmations, unsubscriptions and notes for every account. The aim is that the subscriber is be able to confirm the opt-in, unsubscribe and see notes in a familiar environment.
Confirmation pages
With own confirmation pages you can present your subscribers a familiar environment after he confirmed the opt-in. The confirmation itself still takes place in mail2many, the confirmation pages only function as landing pages. This way the register and confirmation pages can be on the same website and domain.
Prepare page
First, a confirmation page and opt-in expired page must be implemented. Every page must be a publicly accessible HTML page to which mail2many can redirect when an opt-in is confirmed. The pages itself can be implemented with an accompanying language or even just with HTML and CSS.
We suggest that the pages have the same domain as the sender address. If you send your newsletter with newsletter@atrivio.de, for example, the pages should be on the domain atrivio.de.
When someone confirmed the opt-in, mail2many forwards the subscriber to the conformation page.
A simple HTML code could look like this:
When the subscriber was too late and the opt-in was no longer valid, mail2many forwards the subscriber to the opt-in expired page.
The entire process could look like this:
- The subscriber registers on your website.
- Your website calls the /register route from mail2many
- mail2many sends the subscriber a opt-in mailing with a validity of 7 days
- The subscriber confirms the opt-in within the 7 days by clicking the confirm button in the mail
- mail2many is called and confirms the subscriber and redirects him to your page
- You show the subscriber a cofirmation page
If the subscriber would confirm after 7 days, mail2many would not confirm him and redirect him to your optin-expired page.
A single page
If you want to maintain only a single page this is also possible. The confirmation page must then evaluate the parameter valid and display a specific message.
|
Name
|
Example
|
Description
|
| valid |
true |
Indicates if the opt-in was still valid and the subscriber was confirmed |
The confirmation page can evaluate the valid parameter. If it has the value "true" as a string, then the confirmation has been done and a confirmation page should be displayed.
If this is not the case and the value is "false" as string, then the subscriber was too late and the opt-in was no longer valid. In this case, the subscriber should be informed that the confirmation could not be done and he has to subscribe again.
A simple PHP code could look like this:
Store page url
The second and last step is to set up the pages in the respective account. This can be done very easily in the "Settings" area. The link to your page for can be stored under Pages and redirects.
Unsubscribe page
With a own unsubscribe page you can present your subscribers a familiar environment to unsubscribe. The unsubscription itself still takes place in mail2many, the unsubscribe page only functions as an intermediate page and forwards the subscriber to mail2many. This way the unsubscription can be on the same website as the registration.
Attention
If the unsubscribe page is not available or not working correctly, the subscribers cannot unsubscribe from your account. Make sure the connection is setup correctly.
Prepare page
First, the unsubscribe page must be implemented. The unsubscribe page must be a publicly accessible HTML page to which mail2many can redirect when an unsubscription occurs. The page itself can be implemented with an accompanying programming language.
The page should be on the same domain as the sender address. If you send your newsletter with newsletter@atrivio.de, for example, the unsubscribe page should be on the domain atrivio.de.
When somebody wants to unsubscribe, mail2many forwards to the external page and passes three parameters in the url:
|
Name
|
Example
|
Description
|
| unsubscribed |
true |
Indicates whether unsubscription has been performed or not |
| p |
abcdef123 |
An encrypted parameter that contains the mail2many data to unsubscribe |
The unsubscribe page must first evaluate the unsubscribed parameter. If it has the value "true" as a string, then the unsubscription has already been done and a confirmation page should be displayed.
If this is not the case and the value is "false" as string, then the subscriber wants to unsubscribe. In this case, a page where he can confirm the unsubscription should be displayed. If the subscriber confirms, for example, with a button, he must be forwarded back to the mail2many. The mail2many parameter p and the parameter force=true must be transferred to tell mail2many to unsubscribe him now. Then mail2many will unsubscribe him and him redirect back. You can use the Referer header to redirect the subscriber back to the unsubscribe page.
The entire process could look like this:
- The subscriber clicks the unsubscribe link in the newsletter
- mail2many redirects him to the your unsubscribe page and appends the parameters
- The subscriber is shown a page to confirm due to
unsubscribed=false
- The subscriber clicks a "Confirm" button
- The subscriber is redirected back to mail2many with the parameter
p and force=true and unsubscribed there
- mail2many redirects the subscriber again back to the unsubscribe page and appends parameters to it
- Recipient is shown the confirmation of unsubscription due to
unsubscribed=true
A simple PHP code could look like this:
Store page url
The second and last step is to set up the unsubscribe page in the respective account. This can be done very easily in the "Settings" area. The link to your page for can be stored there under Pages and redirects.
Note page
With a own note page you can present your subscribers a familiar environment after an error occured.
Prepare page
First, the note page must be implemented. The note page must be a publicly accessible HTML page to which mail2many can redirect when an error occurs. The page itself can be implemented with an accompanying programming language.
The page should be on the same domain as the sender address. If you send your newsletter with newsletter@atrivio.de, for example, the error page should be on the domain atrivio.de.
When an error occurs mail2many forwards to the external page and passes the reason in the url:
|
Name
|
Example
|
Description
|
| reason |
CouldNotGetSubscriber |
Indicates which error occured |
The error page can evaluate the reason parameter and display a specific error message.
It is of course also possible to not evaulate the reason and display a general error page.
Possible error reasons (Exceptions)
|
Reason
|
Location
|
Description
|
| CouldNotGetSubscriber |
Unsubscribe |
Can happen when the subscriber was deleted in mail2many. |
| CouldNotGetNewsletter |
Browser-Version |
Can happen when the newsletter was deleted in mail2many. |
| BrowserVersionNotAvailable |
Browser-Version |
Can happen when there was an error with the browser-version. |
Store page url
The second and last step is to set up the error page in the respective account. This can be done very easily in the "Settings" area. The link to your page for can be stored there under Pages and redirects.